

spring one room challenge: the earthy kitchen reveal

")

HELLO AGAIN HOME LOVERS! I’M BACK WITH AN UPDATE ON THIS WEEK’S PROGRESS ON THE KITCHEN RENOVATION PROJECT.
We have certainly made a lot of progress toward bringing new life into this kitchen!
FOLLOW THE LAST SEVEN WEEKS HERE:
WEEK 1 | WEEK 2 | WEEK 3 | WEEK 4 |WEEK 5 | WEEK 6 | WEEK 7
Oh my gosh! Are we finally here? I am so blown away by how much we were able to get done! After dreaming about how I would transform this kitchen for years, we finally did it!
I’ve been obsessing over the perfect backsplash to go in place after the countertops are replaced and I’m closer than ever to making a selection. More on that later.
So, how did we get here? Well, let me remind you of where we started:

What it looked like the day we moved in…

While I was removing the popcorn ceiling…
The big project portion this past week was removing the countertops. That was an adventure, sort of. In order to take out the larger pieces, we had to remove the door on the sliding door that leads out to the deck. It took all four of use to move the pieces and place them down outside. My husband, myself, as well as my brother-in-law, and sister-in-law came over to help remove the old countertops and at some points it was comical, but it was a lot of fun and I’m super grateful for the help! So, you can imagine my appreciation for when the two-man crew showed up with some need contraption that was part hand truck and part hydraulic lift. That was really cool to watch! Within an hour, the new countertops were in and ready for finishing touches.
I spent a few hours researching sealers for the new granite and then cross-referenced with what was readily available. I eventually decided on a spray on/rub in/wipe off type and I’m very happy with the results. My main concern about this type of product was how strong-smelling they often are. The particular one I used wasn’t so – not a pleasant smell, but got the job done without many fumes.

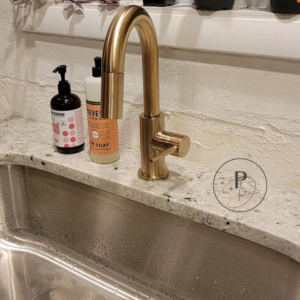
After the countertops and sink were installed, we had to wait a couple hours before placing anything on the surface to allow the caulk adequate time to cure and dry around the basin. Next, we waited until late evening to install the faucet after the glue and caulk around the sink had cured. This also prompted a 9pm trip to the hardware store for plumber’s putty. While my husband went out for the putty, I began installing the faucet which was surprisingly easy compared to removing the old faucet from the previous granite. I had been waiting for this moment for weeks! The shade of the faucet in concert with the stone turned out to be everything I had hoped for. Not to mention, I bought the faucet for quite a deal after opting for an open-box faucet at a much reduced price. When I received the faucet though, everything was in pristine condition and in the original packaging. So there you have it – if you want to save a little bit of money on a big-ticket item, look for an open box return. I purchased mine through Amazon, so I was confident I could return it without issue. I’ll be keeping this faucet for quite a while, though!
The sink is so much larger than our last double sink and I’ve found it so much more practical, which makes it great for washing skinned knees without making a mess! I bought a kit for the pipe we needed to connect the plumbing. There was a drastic difference in comparison to the previous sink. In taking out the old sink, we in effect got rid of the garbage disposal and only needed an offshoot to connect the adjacent dishwasher. The kit I purchased for the piping made it easy (although it took some careful maneuvering) to get everything connected without creating multiple traps. Once we got all the parts connected and secured, we turned on the faucet and flushed the lines. After connecting the dishwasher, we completed testing for leaks and now the sink was fully in service!
You know what that means? Now I had to cook. It’s ok, though. I like to cook!
REMEMBER THIS LIST OF TO-DO’S?
✅ removing the existing popcorn ceiling
⬜ placing a new backsplash still looking for the “right” one and this will take weeks after countertop install
⬜ building a new dining table (original design)
✅ making the cabinet doors & drawer fronts (hello table saw!) in process
✅ attach hardware to new drawer fronts and cabinet doors
✅ new countertop install install date 6/21!!!
✅ measure for templating of the new countertops
✅ level bar area to one level (demo done!)
✅ finalize new flooring selection
✅ remove existing flooring and replace
✅ priming and painting walls (after demo/leveling of the bar wall) (in process)
✅ determine bracket placement
✅ determine backsplash height
✅ lumber for coffee bar shelf (local lumber yard) in process
✅brackets installed for floating shelves (✅right of sink area/✅coffee bar area)
✅ replace light fixture (including the “b00b” one over the sink area)
✅ order new faucet
✅ replacing light fixtures (main dining area fixture ordered w/ estimated delivery mid-June)
✅ replacing faucet & sink (placed when countertops are going in) waiting for countertop install
⬜ cleaning and painting vent covers to match walls – going to replace these eventually
✅ remove upper cabinets to prime and paint walls and cabinets
✅ priming & painting cabinet boxes in process
✅ updating cabinet hardware new hardware ordered & received
⬜ replacing switch plates and outlet covers (after backsplash install)
I had lofty goals for this round of the ORC and I’m so glad I chose to tackle it! I may not be quite finished yet, but we’re so close and I’ll come back here and update as I get it all finished.
now for the reveal!!!

I made a few décor swaps – for instance, my utensil crock is actually a favorite pot purchased from a local plant shop (you also might recognize it from this other ORC project).
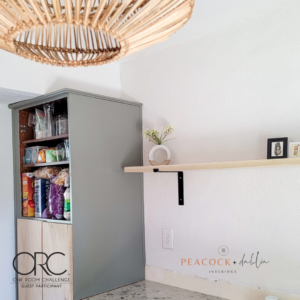
The shelf for the coffee bar will be adorned with hooks for our favorite coffee mugs and finished with Maker brand simple finish. I couldn’t resist adding my collection of moka pots to the top – and, yes, I do use all of them and reserve the largest ones for large groups.
The major component of this project involved replacing all of the cabinet doors and drawer fronts while utilizing the existing cabinet boxes. Though this is an immense cost savings, the time to fabricate all of the doors and drawers is no project for the weary. With the combined skills of my husband and myself, we drew out the existing sizes we needed for the material for the fronts and then color coded by size. It took me an hour to then decode that and group everything accordingly. I’m a visual person, but I needed to touch the actual pieces. Translation – I spent a lot of time staring at the layout paper in frustration, but eventually got it sorted and began trimming the boards on the table saw that we had cut down to size using the circular saw. Up until this project, I had not used the table saw by myself and I’m now comfortable making basic cuts. My favorite? Still the miter saw – but after this project I’m ready to upgrade our current one.
Over the next week or so, I plan to finish the remaining cabinet doors and drawers and get them in place. It’s simply not humanly possible to get the rest of the work done in time and rushing a project is totally not my jam. I hope that this current state gives you a peak inside my head and you can begin to envision the changes. I can’t wait to show it off in its full glory! This project certainly came from my soul and has been renewing in many ways. Finishing plywood like this was a first for me, so I plan to share more of the DIY aspect in an additional post. The above photos are with a single coat of primer, followed by one coat of the topcoat. The cabinet boxes were finished with a coat of primer, followed by two coats of the topcoat.
NOW, FOR THE FINAL PIECES:
The backsplash. Each time I make a few steps toward finding the “right” one, I take two steps back.
Wow. And that’s a wrap!! Designing this kitchen gave me literal butterflies – you know that feeling when you’re meeting for that first date? It’s kind of like that, only I knew all the elements I planned to include in the kitchen and it was essentially replacing the soul of the house. The kitchen is where the heart and soul of the home is, and this one is no different.
Thanks for following along!


Previous Post
Next Post
Not sure where to start?
Get Catherine's complimentary home tips here!

build your furniture investment: the workbook
SHop Our favorite Collections online
how to combine textures for a balanced home

For more of our latest projects, follow along on instagram at @peacockanddahlia
©Peacock & Dahlia 2025 | design by tonic + Sophia STudio | photos by Sophia Studio + Elevae
Intentional Design for Soulful Spaces
virginia beach, va


+ Show / Hide Comments
Share to: